Tutorial for Tahoe-LAFS (Draft)
Hosts setup
In this tutorial we're gonna setup 3 nodes, whatever they are (Host+VM1+VM2)
IPs and hosts are:
- 172.16.23.1 (host.local : Mac OS X 10.6.4)
- 172.16.23.128 (vm1.local : Debian GNU/Linux 5.0)
- 172.16.23.130 (vm2.local : Debian GNU/Linux 5.0)
I'll use a self-explanatory prompt for each host.
Installation on each node
I like pypi so much I find it easier to do the download, extraction, get dependencies and build using it.
# easy_install -U allmydata-tahoe
it failed on the freshly installed debian, with that error :
ImportError: No module named darcsver.setuptools_command
A fast look on google, showed that installing setuptools_darcs and darcsver don't build as expected and may be missing at install time. The fix is to install them first, and only then install tahoe.
 # easy_install -U setuptools_darcs darcsver
 # easy_install -U allmydata-tahoe
then execute tahoe --version to check everything is installed as expected :
on debian :
 % tahoe --version
allmydata-tahoe: 1.7.1, foolscap: 0.5.1, pycryptopp: 0.5.17-r683, zfec: 1.4.7, Twisted: 10.0.0, Nevow: 0.10.0, zope.interface: 3.5.1, python: 2.6.1, platform: Darwin-10.4.0-i386-64bit, sqlite: 3.6.12, simplejson: 2.1.1, argparse: 1.1, pycrypto: 2.1.0, pyOpenSSL: 0.7, pyutil: 1.7.7, zbase32: 1.1.1, setuptools: 0.6c15dev, pyasn1: 0.0.11a, pysqlite: 2.4.1
on MacOSX :
 % tahoe --version
allmydata-tahoe: 1.7.1, foolscap: 0.5.1, pycryptopp: 0.5.19, zfec: 1.4.7, Twisted: 10.0.0, Nevow: 0.10.0, zope.interface: 3.6.1, python: 2.5.2, platform: Linux-debian_5.0-x86_64-64bit, sqlite: 3.5.9, simplejson: 2.1.1, argparse: 1.1, pycrypto: 2.1.0, pyOpenSSL: 0.7, pyutil: 1.7.7, zbase32: 1.1.1, setuptools: 0.6c12dev, pyasn1: 0.0.11a, pysqlite: 2.3.2
now Tahoe is installed \o/
Instantiate the nodes
So, after reading running.html, configuration.txt and architecture.txt, we'll first create an introducer node, that will get every other nodes to know each other. The documentation says that we have to create and launch the introducer as follows (that we do on vm1.local)
 vm1% mkdir tahoe-introducer
 vm1% tahoe create-introducer tahoe-introducer
 Introducer created in tahoe-introducer
 vm1% tahoe start tahoe-introducer
 STARTING /home/guyzmo/tahoe-introducer
 introducer node probably started
 vm1% cat tahoe-introducer/introducer.furl
 pb://6oibvp5whrb3v3ge7ajuyapooswsda2e@172.16.23.128:33272,127.0.0.1:33272/introducer
Then we copy that last string we got from 'cat', and paste it in tahoe.cfg, as follows :
 vm2% vim ~/.tahoe/tahoe.cfg
-------------8<----------------------8<----------------
 22 [client]
 23 introducer.furl = pb://6oibvp5whrb3v3ge7ajuyapooswsda2e@172.16.23.128:33272,127.0.0.1:33272/introducer
 24 helper.furl =
 25 #key_generator.furl =
 26 #stats_gatherer.furl =
 27 #shares.needed = 3
 28 #shares.happy = 7
 29 #shares.total = 10
------------->8---------------------->8----------------
exit, and then do the same on 'host'.
finally, execute on 'vm2' and 'host' the following :
 vm2% tahoe start
STARTING /home/guyzmo/.tahoe
client node probably started

 host% tahoe start
STARTING /home/guyzmo/.tahoe
client node probably started
wait a bit and do :
 % ps aux | grep tahoe
myuser    5360  1.2  7.4 158820 28348 ?        S<   02:13   0:00 /usr/bin/python /usr/bin/twistd -y tahoe-client.tac --logfile logs/twistd.log
and you should see output that looks similar. If not, tahoe failed to start. You've got to check ~/.tahoe/logs/ to see what went wrong.
Configure the nodes
Now, let's do some configuration. On each node edit tahoe.cfg :
 host% vim ~/.tahoe/tahoe.cfg
-------------8<----------------------8<----------------
 10 [node]
 11 nickname = client-host
 12 web.port = tcp:3456:interface=172.16.23.1
------------->8---------------------->8----------------
 host% tahoe restart
 vm1% vim ~/tahoe-introducer/tahoe.cfg
-------------8<----------------------8<----------------
 10 [node]
 11 nickname = introducer-vm1
 12 web.port = tcp:3456:interface=172.16.23.128
------------->8---------------------->8----------------
 vm1% tahoe restart ~/tahoe-introducer

 vm2% vim ~/.tahoe/tahoe.cfg
-------------8<----------------------8<----------------
 10 [node]
 11 nickname = client-vm2
 12 web.port = tcp:3456:interface=172.16.23.130
------------->8---------------------->8----------------
 vm2% tahoe restart
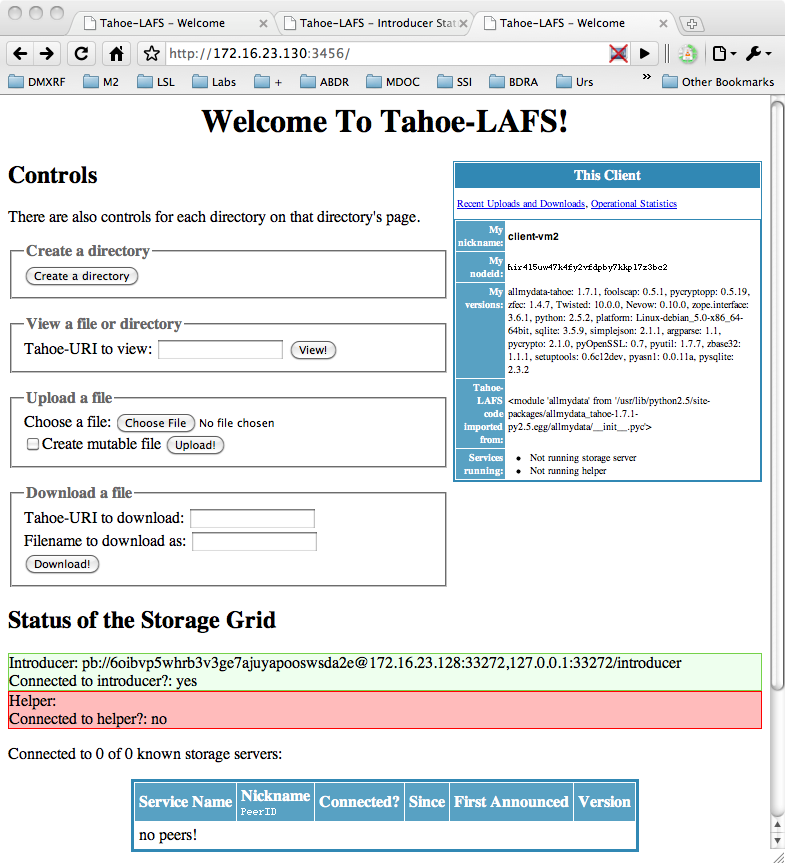
Then browse to the following URLs and you should get pages similar to the ones below
Now it's time to be able to store something on the grid :
On host and vm2, edit again ~/.tahoe/tahoe.cfg and modify it as follows :
 vm2% vim ~/.tahoe/tahoe.cfg
-------------8<----------------------8<----------------
 31 [storage]
 32 enabled = true
 33 readonly = false
 34 reserved_space = 1GB # here you tell the storage server how much disk space it cannot use
------------->8---------------------->8----------------
 vm2% tahoe restart
and the same on host.
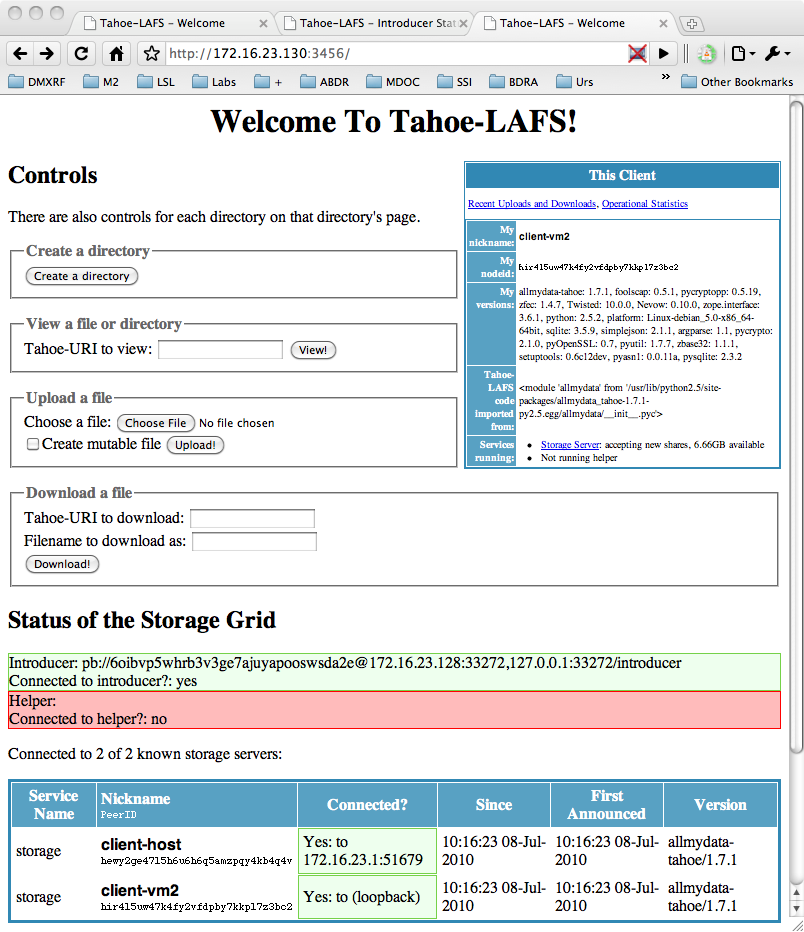
The result would be as follows :
Then, you've got a working Tahoe-LAFS grid working ! Is that all ? Well, no, it's time to learn how to use it.
File capabilities ?
Now it's time for a bit of literature. File capabilities are unique "keys" associated with the files. They are used internally by Tahoe-LAFS to identify every file, and used as an URL to locate the file.
For immutable files, capabilities are like hash table keys, they match a unique file. A single bit difference between two files will give two different capabilities.
For mutable files, there are read-only and read-write capabilities. A read-only capability will point to a version of a file. A read-write capability represent the ability to read the file and the ability to write a new version of a file.
for more informations, look at Capabilities section of: http://tahoe-lafs.org/source/tahoe-lafs/trunk/docs/architecture.txt and at this wiki page: http://tahoe-lafs.org/trac/tahoe-lafs/wiki/Capabilities
Access your shares
You can store and access files on Tahoe-LAFS in many different ways. The fastest is to either use the Web UI (WUI), or the command line (CLI) though you need to know the caps of the files.
Using the WUI is straightforward: connect to a storage client, use the forms to add/get/remove files and directories. Just always remember that once you create a directory, you need to save the directory's URI, or you won't be able to find it again.
Using the CLI
The CLI behaves mostly like a standard shell, with all commands prefixed by 'tahoe'.
If you execute for the first time :
 % tahoe ls
error: No alias specified, and the default 'tahoe' alias doesn't exist. To create it, use 'tahoe create-alias tahoe'.
you'll get that error. That's why you need to create a 'root' directory for CLI commands that will be aliased to the 'tahoe:' prefix.
 % tahoe create-alias tahoe
[...]
socket.error: [Errno 61] Connection refused
What happens here is that the Tahoe-LAFS client tries to connect to the URL given in the ~/.tahoe/node.url file. So, you need to edit ~/.tahoe/node.url
 host% vim ~/.tahoe/node.url
-------------8<----------------------8<----------------
 1 http://172.16.23.1:3456/
------------->8---------------------->8----------------
 vm2% vim ~/.tahoe/node.url
-------------8<----------------------8<----------------
 1 http://172.16.23.1:3456/
------------->8---------------------->8----------------
HINT: each time you do 'tahoe start' node.url gets reset to 127.0.0.1. If you
want to intensively use the CLI, change
'web.port = tcp:3456:interface=172.16.23.1'
to
'web.port = tcp:3456'
in tahoe.cfg. Specifying the interface to listen on is usually a good security policy, though twisted supports only one interface declaration, or all interfaces if you don't declare it.
Now, you can run the previous command :
 % tahoe create-alias tahoe
Alias 'tahoe' created
What it has actually done, is that it edited the ~/.tahoe/private/aliases file linking the keyword you gave with a file cap :
 vm2% cat ~/.tahoe/private/aliases
tahoe: URI:DIR2:bfe7inwcduobfnnrxocqechr4q:huurbpkrtajzdrq6okvxxppj5negccz4payh6gxes5nphe6djbeq
and
 host% cat ~/.tahoe/private/aliases
tahoe: URI:DIR2:ozgebrm5oe52hhcnxhbc6oy6xu:7cyu73izd6q6w4kwngyxxdu7ttuzwy5kl2uybcrqohhen362crla
so, as you can see, different tahoe CLI won't work in the same base directories. If you really want to enable this, copy the same aliases file on every account you want to use the CLI on.
Finally, to use the CLI, have a look at 'tahoe help' for a full description of the commands.
For example, here are some basic commands:
 % tahoe cp README.txt tahoe:
 Success: file copied
 % tahoe ls -l tahoe:
 -r-- 1348 Aug 04 12:52 README.txt
 % tahoe get tahoe:README.txt | head
 ===============================
 Tahoe-LAFS
 ===============================

 Tahoe-LAFS is a Free Software/Open Source decentralized data store. It
 distributes your filesystem across multiple servers, and even if some of the
 servers fail or are taken over by an attacker, the entire filesystem continues
 to work correctly and to preserve your privacy and security.

 To get started please see `quickstart.html`_.
Using the FTP interface
As Tahoe does not have user accounts management, to enable FTP access, we need first to enable authentication and associate root caps to each user allowed to access the system.
/!\ Be sure to have installed twisted version >=10.1 before trying FTP/sFTP interface, tahoe's ftp feature is not compatible with prior versions.
For more informations about FTP/sFTP configuration refer to the documentation:
- http://tahoe-lafs.org/source/tahoe-lafs/trunk/docs/frontends/FTP-and-SFTP.txt
- http://tahoe-lafs.org/trac/tahoe-lafs/wiki/SftpFrontend
- Account file creation
The password file is using a very simple format, each non blank/commented line is following this template :
USER PASSWORD ROOTCAP
so we're gonna setup two users the following way on host:
 host% tahoe create-alias alice
 Alias 'alice' created
 host% tahoe create-alias bob
 Alias 'bob' created
 host% cat ~/.tahoe/private/aliases
 tahoe: URI:DIR2:ozgebrm5oe52hhcnxhbc6oy6xu:7cyu73izd6q6w4kwngyxxdu7ttuzwy5kl2uybcrqohhen362crla
 alice: URI:DIR2:dhl2wcuoppuirtv3gk2lslhx6i:nur5sar5lwfxal63gcjaysu4mxt33l35uw4bqtokby3airqhwehq
 bob: URI:DIR2:r2dwmysrl4wigiov52fmifs2mi:2fdu2l3jxuqupepefmkd3y5vftqatc62vl6elmb5qlgi3gmvpx6a
 host% cat > ~/.tahoe/private/ftp.accounts
 alice h3rp4ssw0rd URI:DIR2:dhl2wcuoppuirtv3gk2lslhx6i:nur5sar5lwfxal63gcjaysu4mxt33l35uw4bqtokby3airqhwehq
 bob h1sp4ssw0rd URI:DIR2:r2dwmysrl4wigiov52fmifs2mi:2fdu2l3jxuqupepefmkd3y5vftqatc62vl6elmb5qlgi3gmvpx6a
 host%
and two users on vm2:
 vm2% tahoe create-alias alice
 Alias 'alice' created
 vm2% tahoe add-alias bob URI:DIR2:r2dwmysrl4wigiov52fmifs2mi:2fdu2l3jxuqupepefmkd3y5vftqatc62vl6elmb5qlgi3gmvpx6a
 vm2% cat ~/.tahoe/private/aliases
 tahoe: URI:DIR2:ozgebrm5oe52hhcnxhbc6oy6xu:7cyu73izd6q6w4kwngyxxdu7ttuzwy5kl2uybcrqohhen362crla
 alice: URI:DIR2:x3y3i3s6h5l7gspse6ol4b7goy:zinwdjlffv23gbv5umyjqcdg3trfmvxdwc77cwae3cpxw6mhtq5a
 bob: URI:DIR2:r2dwmysrl4wigiov52fmifs2mi:2fdu2l3jxuqupepefmkd3y5vftqatc62vl6elmb5qlgi3gmvpx6a
 vm2% cat > ~/.tahoe/private/ftp.accounts
 alice h3rp4ssw0rd URI:DIR2:x3y3i3s6h5l7gspse6ol4b7goy:zinwdjlffv23gbv5umyjqcdg3trfmvxdwc77cwae3cpxw6mhtq5a
 bob h1sp4ssw0rd URI:DIR2:r2dwmysrl4wigiov52fmifs2mi:2fdu2l3jxuqupepefmkd3y5vftqatc62vl6elmb5qlgi3gmvpx6a
 vm2%
If you look carefully to both logs, alice gets two root caps on each target host, while bob is getting the same root cap on both. Of course, the alias creation is optional, but handy for the grid manager to control what the users have.
now, let's update the configuration :
 % vim ~/.tahoe/tahoe.cfg
-------------8<----------------------8<----------------
  22 [ftpd]
  23 enabled = true
  24 port = 8021
  25 accounts.file = private/ftp.accounts
------------->8---------------------->8----------------
 % tahoe restart
 STOPPING /home/guyzmo/.tahoe
 process 3063 is dead
 STARTING /home/guyzmo/.tahoe
 client node probably started
and then, connect your FTP client to tahoe's FTP server:
 % tahoe cp foobar.jpg bob:
Success: files copied
 % lftp bob:h1sp4ssw0rd@172.16.23.1:8021
 lftp bob@172.16.23.1:/> ls
 -rw-------   1 bob       bob                857648 Jan 01  1970 foobar.jpg
 lftp bob@172.16.23.1:/> exit
 % lftp alice:h3rp4ssw0rd@172.16.23.1:8021
 lftp alice@172.16.23.1:~> put cliclac.jpg
 857648 bytes transferred
 lftp alice@172.16.23.1:~> ls
 -rw-------   1 alice     alice              857648 Jan 01  1970 foobar.jpg
 lftp alice@172.16.23.1:/> exit
 % lftp bob:h1sp4ssw0rd@172.16.23.130:8021
 lftp bob@172.16.23.130:~> ls
 -rw-------   1 bob       bob                857648 Jan 01  1970 foobar.jpg
 lftp bob@172.16.23.130:/> exit
 % lftp alice:h3rp4ssw0rd@172.16.23.130:8021
 lftp alice@172.16.23.130:~> ls
 lftp alice@172.16.23.130:/> exit
et voilà !
Configure sFTP access
The procedure is slightly the same as for ftp access. You need to have the ftp.accounts files placed in ~/.tahoe/private/, and we'll consider you already have the one written in the previous section.
/!\ As for FTP access, you need to have twisted version >=10.1.0 installed before trying to use tahoe's sFTP feature.
 % ssh-keygen -f ~/.tahoe/private/ssh_host_rsa_key
 Generating public/private rsa key pair.
 Enter passphrase (empty for no passphrase):
 Enter same passphrase again:
 Your identification has been saved in /home/guyzmo/.tahoe/private/ssh_host_rsa_key.
 Your public key has been saved in /home/guyzmo/.tahoe/private/ssh_host_rsa_key.pub.
 The key fingerprint is:
 3f:a6:c7:38:19:3a:19:3c:ee:77:d5:5a:3d:2f:86:6c guyzmo@vm2
 The key's randomart image is:
 +--[ RSA 2048]----+
 |                 |
 |                 |
 |                 |
 |                 |
 |     .  S    . . |
 |      + ..  . o..|
 |     . = =+o +  o|
 |      = =o+.E o .|
 |     ..o.+ . . . |
 +-----------------+
 % vim ~/.tahoe/tahoe.cfg
-------------8<----------------------8<----------------
  27 [sftpd]
  28 enabled = true
  29 port = 8022
  30 host_pubkey_file = private/ssh_host_rsa_key.pub
  31 host_privkey_file = private/ssh_host_rsa_key
  32 accounts.file = private/ftp.accounts
------------->8---------------------->8----------------
 % tahoe restart
 STOPPING /home/guyzmo/.tahoe
 process 3101 is dead
 STARTING /home/guyzmo/.tahoe
 client node probably started
 % mkdir ./mnt
 % mount_sshfs -p 8022 bob@172.16.23.1:/ ./mnt/
 % ls ./mnt/
 total 1676
 -rw-rw-rw-  luser  staff  857648 Aug  4 17:37 foobar.jpg
Now, you have a 3 nodes grid running with 1 introducer, 2 storage servers and 4 ways to access your files : a WUI, a CLI and accounts for FTP/sFTP access.
Attachments (6)
- 172.16.23.130_3456_1.png (192.8 KB) - added by guyzmo at 2010-08-04T18:51:30Z.
- 172.16.23.128_3456_1.png (155.8 KB) - added by guyzmo at 2010-08-04T18:51:46Z.
- 172.16.23.1_3456_1.png (191.9 KB) - added by guyzmo at 2010-08-04T18:52:02Z.
- 172.16.23.130_3456_2.png (219.7 KB) - added by guyzmo at 2010-08-04T18:52:15Z.
- 172.16.23.128_3456_2.png (176.2 KB) - added by guyzmo at 2010-08-04T18:52:29Z.
- 172.16.23.1_3456_1.2.png (191.9 KB) - added by guyzmo at 2010-08-04T18:52:41Z.
Download all attachments as: .zip